Cycling enthusiasts understand the importance of keeping their bikes in peak condition. One of the key components that often gets overlooked in regular maintenance is the freehub body. This vital part of your bike’s drivetrain plays a critical role in ensuring smooth pedaling and gear shifting. Neglecting the freehub can lead to issues like rough pedaling, annoying noises, and even complete drivetrain failure. In this comprehensive guide, we will delve into the intricacies of the freehub body, providing step-by-step instructions on how to service it.
Understand that this is not a guide for how to service Elitewheels’ hubs, rather it is to give an explanation for hubs in general. For information on servicing road, gravel, TT, and MTB hubs, please contact our customer service.
What is a Freehub Body?
Definition and Function
The freehub body is a crucial component of modern bicycles, located on the rear wheel. The mechanism of freehub allows the rider to coast, or stop pedaling while the bike continues to move forward. The freehub is connected to the rear sprockets, or cassette, and allows for the transfer of power from the pedals to the wheels.
When you pedal, the freehub body engages with the cassette, driving the wheel forward. When you stop pedaling, the freehub disengages, allowing the wheel to spin freely without resistance from the drivetrain. This is made possible by a system of pawls and springs inside the freehub that engage with ratchets to create this mechanism.
Common Types of Freehub Bodies
There are several types of freehub bodies, each designed to fit different hub standards and cassette configurations. The most common ones include:
Shimano/SRAM Freehub: The most widely used standard, compatible with Shimano and SRAM cassettes with 8, 9, 10, 11, and 12 speeds.
Campagnolo Freehub: Specifically designed for Campagnolo cassettes, with different spline patterns compared to Shimano/SRAM.
XD Driver Body: Used for SRAM’s 11 and 12-speed mountain bike cassettes.
Micro Spline: Shimano’s design for 12-speed mountain bike cassettes.
Each type of freehub body may have slightly different servicing requirements, but the general principles of maintenance are consistent across all types.
Most wheelsets from Elitewheels are compatible with Shimano/SRAM freehubs, offering various options to meet your needs.

Why Servicing a Freehub Body is Important
Performance Benefits
Regular servicing of your freehub body ensures optimal performance of your bike. A well-maintained freehub will:
Enhance Pedaling Efficiency: Clean and properly lubricated pawls and springs will engage and disengage smoothly, allowing for efficient power transfer.
Reduce Noise: Servicing can eliminate the clicking or grinding noises often associated with dirty or worn freehub components.
Prolong Component Life: By preventing dirt and grime from wearing down the internal parts, regular maintenance can extend the life of the freehub and related components.
Preventing Common Issues
Neglecting freehub maintenance can lead to several issues:
Slippage: Dirty or worn pawls may fail to engage properly, causing the freehub to slip during pedaling.
Sticking Pawls: Over time, grease can become contaminated and thick, causing pawls to stick and fail to engage.
Corrosion: Moisture and dirt can lead to corrosion of internal components, especially in wet or humid conditions.
Servicing your freehub body at regular intervals can prevent these issues and ensure a smooth, safe ride.
Tools and Materials Needed
Before you begin servicing your freehub body, it’s essential to gather the necessary tools and materials. Having everything on hand will make the process smoother and more efficient.
List of Tools
Cassette Lockring Tool: For removing the cassette from the freehub body.
Chain Whip: To hold the cassette in place while loosening the lockring.
Hex Wrenches: The size depends on your hub.
Cone Wrenches: If your hub uses cone nuts, these are required.
Flat-Head Screwdriver: Useful for prying out seals or gaskets.
Pick Set: To remove small springs and pawls.
Torque Wrench: For correctly torquing bolts during reassembly.
Needle-Nose Pliers: For handling small components like springs and pawls.
Types of Lubricants and Cleaning Agents
Degreaser: A high-quality bicycle-specific degreaser to clean old grease and grime.
Isopropyl Alcohol: For a final clean and to remove any residue left by degreaser.
Grease: Lightweight grease for lubricating the freehub body internals. Avoid heavy or sticky greases that can cause pawls to stick.
Light Oil: For lubricating pawls. Some freehubs require oil rather than grease for optimal performance.
Rags and Brushes: For cleaning and applying lubricants.
Preparation Before Servicing
Safety Precautions
Before you start, ensure you’re working in a clean, well-lit area. Wear gloves to protect your hands from grease and sharp components. If you’re using chemicals like degreaser or isopropyl alcohol, make sure the area is well-ventilated.
Initial Inspection of the Freehub Body
Start by spinning the rear wheel and listening for any unusual noises. Check for play in the freehub by rocking the cassette back and forth. If you notice excessive play or grinding, your freehub likely needs servicing.
Removing the Wheel and Cassette
Remove the Wheel: First, remove the rear wheel from the bike. This typically involves disengaging the quick-release skewer or through-axle and sliding the wheel out of the dropouts.
Remove the Cassette: Use the chain whip to hold the cassette in place, and the cassette lockring tool to loosen and remove the lockring. Slide the cassette off the freehub body, taking care to keep the cogs and spacers in the correct order.

Step-by-Step Guide to Servicing a Freehub Body
Disassembly of the Freehub Body
Remove the Axle: Depending on your hub design, you may need to remove the axle to access the freehub body. Use the appropriate hex or cone wrenches to loosen the nuts and slide out the axle.
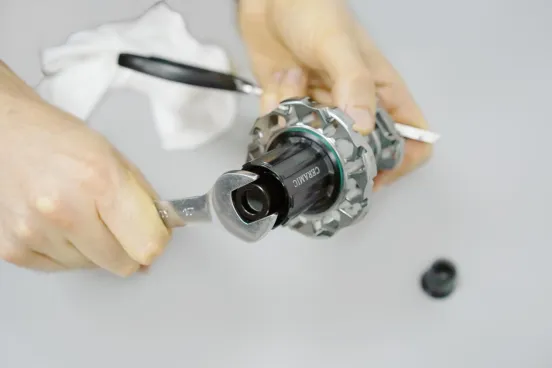
Detach the Freehub Body: With the axle removed, you can now access the freehub body. In some cases, the freehub body is secured with a 10mm hex bolt located inside the hub shell. Use a long 10mm hex wrench to unscrew this bolt and slide the freehub body off the hub.
Disassemble the Freehub Internals: Once the freehub body is removed, carefully disassemble it. Depending on the design, this may involve removing seals, pawls, springs, and bearings. Pay close attention to the order and orientation of parts, as they will need to be reassembled correctly.
Cleaning and Inspection
Clean All Components: Soak the disassembled freehub body parts in degreaser to remove old grease and grime. Use brushes and rags to scrub away stubborn dirt. Rinse with isopropyl alcohol to remove any remaining degreaser residue.
Inspect for Wear and Damage: Carefully inspect all components for signs of wear or damage. Look for cracks in the freehub body, worn pawls, weak springs, and damaged bearings. Replace any components that show signs of excessive wear.
Lubrication and Reassembly
Lubricate the Bearings: Apply a light layer of grease to the bearings before reassembly. Ensure they spin smoothly with no roughness.
Lubricate the Pawls and Springs: Depending on your freehub design, apply either a light grease or oil to the pawls and springs. Be careful not to over-lubricate, as this can cause the pawls to stick.
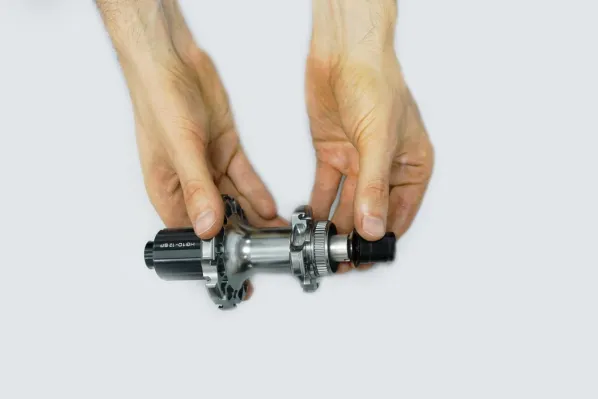
Reassemble the Freehub Body: Carefully reassemble the freehub body, ensuring all parts are installed in the correct order. Pay special attention to the orientation of the pawls and springs.
Reattach the Freehub Body: Slide the reassembled freehub body back onto the hub shell and secure it with a hex bolt if your freehub body requires it. Torque the bolt to the manufacturer’s recommended specification using a torque wrench.
Reinstalling the Freehub Body
Reattaching the Freehub to the Wheel
Once the freehub body is serviced and reassembled, you can begin reattaching it to the wheel. Make sure the freehub is seated properly on the hub and that the bearings are aligned correctly.
Reinstalling the Cassette
Slide the Cassette Onto the Freehub: Start with the largest cog and work your way down to the smallest, ensuring each cog is properly aligned with the splines on the freehub body. Don’t forget the spacers if your cassette requires them.
Tighten the Lockring: Once the cassette is in place, use the cassette lockring tool to tighten the lockring to the manufacturer’s recommended torque.
Rechecking Alignment and Functionality
Before reinstalling the wheel on the bike, spin the freehub by hand to ensure it rotates smoothly. Check for any play or unusual noises. If everything feels right, reinstall the wheel on your bike, securing it with the quick-release skewer or through-axle.
Post-Service Maintenance Tips
Regular Inspection Schedule
To keep your freehub in top condition, perform regular inspections. Check for smooth rotation, listen for any unusual noises, and inspect for play in the freehub. For riders who frequently ride in wet or muddy conditions, more frequent servicing may be required.
Troubleshooting Common Issues
Noisy Freehub
If your freehub is making more noise than usual, it could be due to a lack of lubrication or dirty pawls. Disassemble the freehub, clean it thoroughly, and apply the appropriate lubricant to resolve the issue.
Sticky Pawls
Pawls that stick and fail to engage properly can cause slippage. This is often due to old, thickened grease. Cleaning the pawls and applying a lighter lubricant should solve this problem.
Loose or Wobbly Freehub
A freehub that feels loose or wobbly could indicate that the bearings are worn or the securing bolt has loosened. Check the bearings for wear and ensure all bolts are tightened to the correct torque specification.

Frequently Asked Questions
How often should I service my freehub body?
The frequency of servicing depends on how often and in what conditions you ride. Generally, servicing your freehub body once or twice a year should suffice for most riders. However, if you frequently ride in wet or muddy conditions, more frequent servicing is recommended.
What is the difference between a freehub and a freewheel?
A freehub is an integrated part of the hub where the cassette is mounted, allowing for coasting. A freewheel, on the other hand, is a mechanism where the ratchet mechanism is part of the cassette assembly itself, and it threads onto the hub. Freehubs are common on modern bikes, while freewheels are typically found on older or entry-level bikes.
Can I use any lubricant on my freehub body?
No, it’s important to use the correct type of lubricant for your freehub. Lightweight grease or specific oils are recommended. Heavy greases can cause pawls to stick, and improper lubricants can attract dirt, leading to more frequent servicing needs.
Conclusion
Servicing your freehub body is an essential aspect of bicycle maintenance that ensures smooth operation and extends the life of your bike’s components. While it may seem daunting at first, with the right tools and knowledge, it’s a manageable task that can greatly enhance your riding experience. Regular servicing prevents common issues, improves performance, and ensures that your bike remains reliable whether you’re commuting, touring, or hitting the trails.
By following the steps outlined in this guide, you’ll be able to confidently service your freehub body, keeping your bike in top condition and enjoying a smoother, more efficient ride.